Laundry Detergent DIY

13 Jan

This is one of those home-remedy type of DIYs that I really should have jumped on long before 2015, but it hasn’t really been until nowadays that I’ve actually needed to pinch pennies and find ways to save a buck or two – not working’ll do that to ya! Anyway, there are endless tutorials on how to make homemade laundry detergent all over Pinterest, so I won’t go into crazy amounts of detail here, but my combination of ingredients was a mash-up between two “recipes” that I found to be both easy enough to follow and convincing enough to make me a believer (those can be found here and here) with the biggest reason to try it out being the huge money-saving advantages. This recipe makes over 285 oz. of laundry detergent.  You only need to use 1 tablespoon or half an ounce of detergent per load (2 tablespoons for more heavily soiled loads) which adds up to over 570 loads of laundry for less than $25!!! Yeah. And for our household, we do maybe 2 -3 loads of laundry per week, so we’re talking over 2 years worth of soap for less than $25, and that’s with using a full 2 tablespoons!

Just mix up the following ingredients and you’re good to go:
  • 2 bars of Zote soap (14.1 oz each) – I found Zote soap that was already grated, so I went with that instead of shredding down bars of soap, but you can do it either way
  • 1 box of Arm & Hammer Washing Soda (55 oz)
  • 1 box of Arm & Hammer Baking Soda (4 lb)
  • 1 box of Borax (4 lb 12 oz)
  • 1 tub of Oxi-Clean Stain Remover (3 lb)
  • Downy Scent Crystals (9 – 26 oz depending on how scented you want your soap to be)

Most of these items will be located in the detergent aisle except the baking soda which should be located in the baking aisle of most grocery stores.

IMG_4375 IMG_4376 IMG_4378 IMG_4379 IMG_4380

We had enough soap to fill the large glass jar, the small Ball jar, AND the Oxi-Clean tub! I’ve already done 3 loads of laundry with it and so far so good.  Everything came out clean and fresh smelling, so I think this home remedy is definitely a winner 🙂

The Big Move

6 Jan

As most of you know, we picked up and moved 4 hours south to the big ol’ city of San Antonio in July of last year:) Yep, San Antonio, Texas… except we didn’t quite move to the city.  That’s right, country living is the life for us in this new chapter we’ve started!  The move was brought on by many factors, some family related, but mostly for personal growth opportunities not only for myself, but also for Olive and Billy – my newly “betrothed lover”(we decided we liked the sound of that better than fiance). 

So here we are, finding our bearings after moving just 6 months ago with the goal of setting up a homestead/sustainable living space in mind.  The land we are on belongs to my most awesome grandpa – that’s about the best part of the entire move for me, being able to be close to him.  The property is just around 2.5 – 3 acres (after several times whittling it down over the years) with roughly 1.5 – 2 of those acres at our disposal to work with.   I have endearingly nicknamed our new digs “the paper house,” but plastic is probably a more accurate term than paper.  Whatever the materials for fabricating this lovely home of ours, there’s without a doubt that it is just that – fabricated.  I’ve always grown up calling these babies “trailers,” but not long after shopping for one, we found that the new industry term is “mobile home.” So here you have it, a glimpse at our new mobile home and the property it sits on…

These are the photos that we took at the mobile home dealer in our initial walk-through of the model home:

IMG_2742The living room:

mobile home, trailer, house, home, homestead, apples for olive, San Antonio

mobile home, trailer, house, home, homestead, apples for olive, San Antonio

The kitchen:

mobile home, trailer, house, home, homestead, apples for olive, San Antoniomobile home, trailer, house, home, homestead, apples for olive, San Antoniomobile home, trailer, house, home, homestead, apples for olive, San Antonio

The master bedroom and bathroom (located on the other side of the kitchen through the white door pictured three photos up):

mobile home, trailer, house, home, homestead, apples for olive, San Antoniomobile home, trailer, house, home, homestead, apples for olive, San Antonio

mobile home, trailer, house, home, homestead, apples for olive, San Antonio

The fancy “glamor bath” :

mobile home, trailer, house, home, homestead, apples for olive, San Antonio

There’s also a stand-in shower on the other side of the sink that I didn’t get a picture of.

His and her’s walk-in closets (this was a HUGE selling point for us) :

mobile home, trailer, house, home, homestead, apples for olive, San Antonio

The hallway on the opposite end of the house where the spare bedroom, Olive’s bedroom and second bathroom are located:

mobile home, trailer, house, home, homestead, apples for olive, San Antonio

I’ll get an update on Olive’s bedroom posted soon.  That’s pretty much the only room we’ve done anything to since there’s not much to work with as far as the interior of the home goes, but that’s not why we moved out here anyways.  We want to tackle the great outdoors!

Here’s a pic of the house that my aunt sent me when she drove by before we moved down:

mobile home, trailer, house, home, homestead, apples for olive, San Antonio

And here’s what things are looking like after the Texas summer-sun scorched that pretty green turf (the purple house in back is Grandpa’s house) :

mobile home, trailer, house, home, homestead, apples for olive, San Antonio

mobile home, trailer, house, home, homestead, apples for olive, San Antoniomobile home, trailer, house, home, homestead, apples for olive, San Antonio

This is the area opposite of the driveway where my great-grandparents built their home in the early 1900’s out of an old school-house, hence the location of the well.  I’ll definitely post some old photos if I can get my hands on them.  My family history surrounding this place is something else that helped influence my decision to move out here:

mobile home, trailer, house, home, homestead, apples for olive, San Antonio

mobile home, trailer, house, home, homestead, apples for olive, San Antonio

mobile home, trailer, house, home, homestead, apples for olive, San Antonio

Just past those trees pictured above is an open area of land where my grandparents would garden from time to time.  Just past that, beyond the barb-wire fence, is my great-aunt and uncle’s place (my grandmother’s brother and his wife) where they keep a handful of cows that keep things lively around here:

mobile home, trailer, house, home, homestead, apples for olive, San Antonio

mobile home, trailer, house, home, homestead, apples for olive, San Antonio

The driveway from the other end:

mobile home, trailer, house, home, homestead, apples for olive, San Antonio

This picture was taken from my grandfather’s front patio:

mobile home, trailer, house, home, homestead, apples for olive, San AntonioJust about the only project we’ve started outside other than working on getting this bad-boy skirted out, is making the front steps out of pallets.  As you can see we have a pretty sizable collection of pallets sitting in our back yard, most of which will be getting used to build a storage shed (more on that to follow) :

mobile home, trailer, house, home, homestead, apples for olive, San Antoniomobile home, trailer, house, home, homestead, apples for olive, San Antonio mobile home, trailer, house, home, homestead, apples for olive, San Antonio

So there you have it, the start of our newest adventure together 🙂  We had a few hurdles to jump through when we first moved, mostly dealing with permits which pushed back actually living in our house to September, the very end of September, even though we moved in July (living electricity-free in a trailer in the dead heat of summer was not an option for us) so we stayed with grandpa for a couple of months, which turned out to be a good thing in the end 🙂

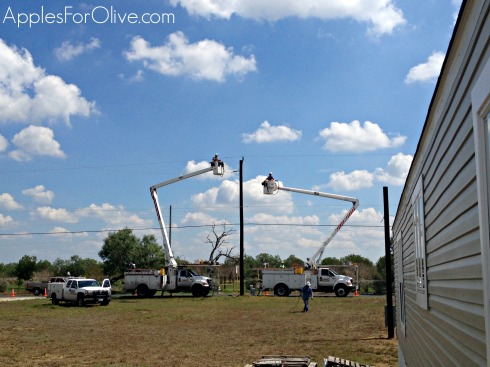
On September 29, 2014 when we finally got electricity.  Glorious, glorious electricity! :

mobile home, trailer, house, home, homestead, apples for olive, San Antoniomobile home, trailer, house, home, homestead, apples for olive, San Antonio

And one last shot of the house for good measure 🙂

OLYMPUS DIGITAL CAMERA

THANKS FOR LOOKING!

Spray Painted Vinyl Chair

21 Mar

Way back in September when I wrapped up my entryway tree, I plunged into a little DIY project that went along with that update – I spray painted a vinyl chair.  Yep.  You heard read that right. I would have never thought of giving a chair a facelift with spray paint (a dresser or end table, yes…) until I stumbled upon this blog post on Little Green Notebook that completely opened my eyes to a whole new world of spray painting options!

I’ve had these two blue, vinyl club chairs for a few years now.  I love them.  They are well made and comfortable to sit in, but I’ve always thought that I’d reupholster them – they are a shade of blue that’s neither modern nor funky enough to really look as good as they could otherwise, they’re just kind of dull and blah.  So I dove in without a second thought and gave one of them a cool new hue… green… sea-foam green… Krylon’s “Catalina Mist” to be exact:

850214

I went on ahead and bought a can of clear spray enamel to use as a finishing coat as well since the Catalina Mist did not come in a spray that indicated it would bond to plastic (as per the DIY instructions I was going by on Little Green Notebook) which is key in making this project work – IF YOU WANT TO SPRAY PAINT VINYL AND HAVE IT STICK, YOU MUST USE SPRAY PAINT THAT BONDS TO PLASTIC.

The process was pretty simple. I just gave the chair a good cleaning with a degreaser, wrapped the legs in trash bags and taped them off, and then just went to town spray painting:

IMG_2087

IMG_2088

IMG_2086

IMG_2084

It feels completely smooth to the touch as if the vinyl itself was sea foam green all along 🙂

Thanks for looking!

Daybed

30 Dec

20131230-152043.jpg
Check out how I turned an old set of twin mattresses into a cute little daybed for the office by clicking here.

Entryway Organization – Shelf & Hooks

21 Nov

Getting hooks, a shelf, and a bench in place in this entryway has been on my to-do list for well over two years, and I am ecstatic to finally have it done! The entryway seems to be the drop zone/leave-all place that hadn’t been given any real thought as to where all the things that enter this house will get dumped placed… until now.  With the wall hooks up, jackets and scarves won’t land on the floor, reusable bags are in plain sight; with the bench in place, Olive’s backpack and endless stream of papers have a nice designated area to land.  This kind of organization brings me to happy 🙂

Before I get into all the how-I-did-it details, here’s the end result:

DSCF7725

🙂

I started by adhering the wall “decal” that I ordered from Urban Outfitters.  I put decal in quotes because it really seemed more like wall paper, not the peel-and-stick image that comes to mind when you see the word decal.  The mural was in four strips that you place in a tub of warm water, activating the sticky backing, before sticking it to the wall.  But even though I found myself doing more work than I intended (this is diy after all) I am super pleased with the end result!

DSCF7674a

Next, I did some measuring and had the nice folks at Home Depot cut two pre-primed 1×2’s and one 1×3, along with a piece of raw pine, down to the length I needed.  Then Olive and got busy painting:

DSCF7671

DSCF7675

The paint color we used is Behr’s “Bavarian Forest”.

Then I turned my focus onto getting the shelf ready to hang:

entryway Collage 1

Next, using long finishing nails, I hammered the first 1×2 in place:

DSCF7681

Then the overhead shelf went up:

DSCF7682

Followed by the second 1×2:

DSCF7683

With an xacto knife, I carefully  sliced the small strip of overhang that was left, resulting in this:

DSCF7685

Looking pretty good so far 🙂

Next on the agenda was to get the wall hooks painted, distressed and poly’d.  I used stainless steel hooks from IKEA that I spray painted oil-rubbed-bronze; three iron hooks that I ordered separately from eBay, spray painted white, blue-green and yellow, followed by a coat of polyurethane; and one random hook that I bought from World Market left as-is:

entryway Collage 2

entryway Collage 3

While all the hooks were drying and curing up, I hammered the final 1×3 in place, caulked the seems, spackled over the nail holes to smooth everything out, and did the final paint touch-ups.  I also added three thin coats of polyurethane to the pine shelf, allowing each coat to fully dry in between:DSCF7701

DSCF7728

And that was pretty much it! The “bench” is actually a coffee table, but it serves us well until I  find or make the perfect bench I’m looking for.  I couldn’t be happier with the way the entryway feels so much more organized and uncluttered with this little addition 🙂

DSCF7725

DSCF7723

And of course, I can’t leave out the insperado behind this all.  Here are a some of my favorite entryways that I have pinned on Pinterest (click here for even more entryway eye candy):

IMG_2921

click pic for source

IMG_7156

click pic for source

IMG_3746

click pic for source

IMG_9838

click pic for source

THANKS FOR LOOKING!

When the Shoe Doesn’t Fit …

5 Aug

We have probably all found ourselves in one of those situations where we are looking (STARING) at something and think, “you know, something here just isn’t right.”  All of us have been there at some point or another.  And in all reality, that isn’t such a bad place to be when it comes to the creative process.  It most likely means that in the midst of bringing your creative vision into fruition, you are moving along course with your intuition and specific design preferences as your guide.  And that is a good place to be.  Course-correcting is all part of the design game, and I found myself dealing with a creative- curve-ball that was thrown my way last week.  After painting the accent wall in the green room and putting the furniture in place, I could instantly tell that something just wasn’t right. And here’s how I turned that situation around…

Adding all those beautiful and vibrant colors to the accent wall left the two adjacent walls looking just a little too meh by comparison, you can see what I mean in this pic:

a_2683a

The accent wall was meant to be the shining star in the room, but it was not meant to leave the other walls looking dull and lifeless.  It was also clear that the floral print couch and floral curtains could use some taming down as well. So I came up with a new plan – paint the adjacent walls and move the couch into the blue room. YES! … but what color, and what to do with the empty space where the sofa used to reside??? It didn’t take me long to decide on what color to paint the walls. I thought to use the same blue in the blue room, that way the two rooms would blend better and flow together.  But just to be certain, I first visited the Sherwin Williams color visualizer to see if that color would do the trick :

22222a

I loved it! And after actually painting the walls with that color:

col 1212

IMG_6648

IMG_7949

I love it even more.  It just makes sense.  It not only ties the two rooms together, but it also helps keep the accent wall grounded and blend more with the rest of the space.  I couldn’t be happier with the color choice 🙂

And as for the second question at hand, (what to do with the empty, now couchless space) well you’ll have to stay tuned for that… here’s a clue-in, it’ll be a pretty quick and easy DIY project that I have pinned on one of my Pinterest boards 🙂

Sometimes the road to getting a room “done” (are they ever really done?) isn’t a straight path, but that’s what makes this whole thing a fun and exciting journey … at least that’s what I keep telling myself 🙂

Oh, and you might also be wondering what I will be calling the green room now that it isn’t green anymore.  I’ve decided that here on forward, that room will now be “the office (fka the green room)”.  I like it, has a nice ring to it, ha!

THANKS FOR LOOKING!

Green Room Progress – Organization and Styling

23 Jul

Here’s where we left off in this room’s progress – just getting the accent wall all finished up :

IMG_7198a

You may or may not already know that this accent wall will now be the lovely backdrop to my computer desk and almost all of my art/craft supplies.  Already having all the necessary furniture on hand over in the adjoining blue room made achieving this setup pretty easy.  Here’s a most fabulous depiction of the intended furniture arrangement below:

IMG_0843a

And here is how it was looking after getting the desk and Expedit bookshelves in place, not without first replacing the pole-shaped legs (as seen three photos down) with much more attractive hairpin legs that I bought on eBay:

GetAttachment 2

IMG_1281a

Things are already starting to take shape in there, yay!

Next on the to-do list was to move the computer over, move the old desk out of the room, and add the floating shelf above:

IMG_9640a

Now some of you might think painting an accent wall like this would be the hardest part of this whole little reorganization project I have going on in here, but this next task is proving itself to be much, MUCH more challenging for me… and what task might that be, you ask? That would be the organization and styling of all my art/craft supplies onto these shelves (ALL THESE SHELVES!)  Where do I even begin?!  Here’s what I’m working with:

DSCF0719

GULP. That’s intimidating. Getting the furniture moved over was the easy part, but getting all that other stuff moved over and not looking like a jumbled mess is a whole different story. I want organized, not messy.  I want clean, not junky.  I want pretty, not wow-what-a-mess! Acheiving this part of the task is proving itself challenging, but I have faith in myself that I can get something set up that works on a highly functional, efficient and organized level along with looking super pretty and easy on the eyes.  This little trip to Target (and admittedly two similar ones to Home Goods and JCP) is helping me along in the right direction:

IMG_8225

Here’s how the room is taking shape so far:

IMG_4431a

I’m still working on getting things organized and styled up, but I’ve already added new curtains and updated the lighting (more details on that to follow).  It’s definitely coming along, and hopefully I’ll have things done by month’s end and can share “the big reveal” with y’all then!

Patio Perk Up Round Two

2 Jul

In an attempt to both spruce things up out on the patio and keep a few busy, busy children from getting far too bored, we took this little corner of the patio from looking like this:

20120927-154058.jpg

to this in a matter of an hour or so:

DSCF7636

Here’s how this red ladder that I’ve had for years (it’s a tad too wonky for actual use and has just been sitting pretty useless in my garage) and this old stool that I nabbed from someone’s curbside throw away pile looked before they were given new life:

IMG_0856

Using and mixing paints we already had on hand, I put my little helpers right to work:

paint Collage

IMG_0874

Such great little worker bees they are!

IMG_0876

DSCF7637

Looking a bit more lush and airy, I like! And I finally found the perfect spot for my macrame plant holder 🙂


THANKS FOR LOOKING!

Getting Graphic in the Green Room – Accent Wall Style!

8 May

I decided way back some time last year that the green room was in need of a little makeover, (more details on that to follow, so stay tuned) and what better way to get started in that direction than to do an accent wall?!

Ahh, the beloved accent wall – a new one pops up on my Pinterest feed at least three times a week, and it seems as though everyone in blogland is doing one… and well … now so am I!

Check it out:

IMG_7198a

PicMonkey Collage 2

I thought long and hard about how to accent this wall for a very, very long time – going from thoughts of a solid contrasting color, to stripes, to something stenciled, to finally deciding on something grahic, abstract and super colorful.  Even though this little project was a long time a coming, I am glad that I deliberated over it for as long as I did, making sure that it was something that I would absolutely love and that reflects me.

Here’s a quick little pictorial rundown of my day-to-day progress: (I am currently working on a more detailed how-to that’ll even include a little step-by-step video, so again, stay tuned for that!)

IMG_2105IMG_1961

And finally, after making a few more tweaks, I called this turkey done!

IMG_7198a

My inspiration for this project came primarily from the painting below by my super talented and bestie, Devon Nowlin:

3336695746_01d84e2627

and also from this image that I came across on Etsy:

IMG_7743

As an added bonus, I completed this project just in the nick of time to submit toward the self-imposed  “Pinterest Challenge” that the ladies over at YoungHouseLove and BowerPower cooked up to get folks to stop pinning and start doing their pinned projects (more on that here). So you can click on the button below to get in on this big ol’ pinterest-project-share-fest and check out lots of other fabulous DIY projects that the great people of blogland are doing and showing off:

Print

Here are some of the accent walls that I have pinned along the way that have inspired me to create an accent wall of my own:

IMG_4216

click pic for source

IMG_8366

click pic for source

IMG_9224

click pic for source

Thanks for looking!!!!!

Master Bedroom Painted!

11 Mar

Well it only took me three weeks (working at it a few weeknights a week) but it’s finally all done! This was my first attempt at painting a ceiling, aside from the teeny tiny one in the master bathroom, and also my first time to paint all the trim in a room, which for this room included baseboards, crown moulding, two door surrounds, three window sills and also the closet trim.  Whew, glad it’s all done!!! And I am very, very pleased with the results 🙂

I wanted the walls a shade of greige, something earthy and clay-like, so with the following inspiration colors in mind…

IMG_0251

9

… I narrowed it down to these three options:

25

Benjamin Moore’s “Revere Pewter,” “Baby Fawn,” and ” Dove Wing.”

After slapping a sampling of each color on a variety of walls in my bedroom, right away it was clear that “Dove Wing” was much too light and “Revere Pewter” was too cool for my liking.  I really liked “Baby Fawn,” but didn’t find the hue saturated just quite enough, so I tried a fourth sample – “Baby Fawn” mixed at 100% darker, and BAM! I found my color:

20

18b

I decided to paint the trim semi-gloss ultra white first, that way I didn’t have to be too precise in my efforts, and boy, what a difference it made:

22b

It’s so clean-looking and really makes everything pop!

After getting through that phase, I tackled the ceiling next, mainly because I really wanted it painted and I knew the likelihood of me ever getting around to doing it after the walls were complete would be drastically decreased if I didn’t do it first! My first thought on ceiling color was to go lighter.  I thought I would just mix all the paint samples along with some of the wall paint and go with that, but after a little deliberation, I decided that I wanted to paint the doors in there black, so I thought making the ceiling a little darker and moodier would tie everything together real nice (we’ll see how that all works out at a later time).  So in addition to all the samples getting mixed together, I added a little black to the mix, which resulted in this:

8

6

Then finally, the following week, Olive and I got busy painting the walls, which you can see a peek of in the above photo:

12 13

The final outcome:

14

1

2

I really like it! The wall color leans toward a warmer beige tone at well-lighted times, and toward a cooler gray tone in low-key lighting. I’m currently working on getting the curtains back up and I’m already liking how the darker accent colors pop against the more neutral wall color.  So hopefully the addition of a dark headboard and black doors will all work out in the end, we shall see…

Thanks for looking!